Sunday, April 2, 2023

A Step by Step Guide to the Flower Pot Easel Card

Sometimes we need a nice and simple but a little more unusual card for someone close to us.

I had seen this flower pot easel card floating around the internet, and thought that it could be used for a whole number of occasions, both happy but also sad.

This months card was created for the Perfect Time to Craft Challenge April 2023 design team, and is sponsored by The Hungry JPEG.

For this card, both the backing paper on the base and the flowers are from the Mediterranean flowers bundle.


So here is how I made it.

First, I chose the background and corresponding topper from the bundle above. I printed off 3 copies of the topper and 1 copy of the background, then fussy cut one full topper and some extra flowers from the other toppers to sit on my flower pot. 

For the card blank, I took a piece of white card, and cut it to 11 inches by 4-1/4 inches.

I then scored this at 5-1/2 inches (in half) and at 2-3/4 inches (quarter). This gives us the basic Z-fold for the flower pot to sit on. 

I took a pink piece of card as the background mat, and cut 1 piece to 5-1/4 inches by 4 inches for the base, and a second piece measuring 4 inches by 2-1/2 inches to cover the top piece of my Z-fold card.

I also cut out some additional pieces of card as follows:

1 piece of background paper measuring 5 inches by 3-3/4 inches for a matching mat on the bottom. If you have directional paper, don't forget to cut this so that the pattern is facing the right way (5 inches is the height and 3-3/4 is the width).

1 piece of 3-1/2 inch (tall) by 4 inch (wide) brown card. I made a small mark 3/4 inch in from either side on the bottom. Using my trimmer, I lined up the top left corner with the mark I  made on the left side and cut the slope. I then did the same to the right side. This gave me a little flower pot shape.

To make the flower pot look more realistic I also cut a piece of brown card - 4-1/4 inches by 1 inch to sit at the top of the flower pot - for the rim. You cant actually see it on this card but it also gives a better support for all the flowers and leaves we had.

I now had all my pieces ready to use.


As this card is a top fold card, I added the mats and layers with the background paper in the right direction.

I glued the thin brown strip to the top of the flower pot and then lined the bottom of the flower pot with the mat layer so that it would sit nicely before sticking the top half of the flower pot to the top of the z-fold.

I glued on the main flower border that I had chosen, and built up the bouquet using the additional flowers I had already prepared - with the exception of 1 which was reserved for the stopper.

For the stopper, I used two layers of foam pads to stick to the base. This lifted up the stopper nicely so that the card would sit better.

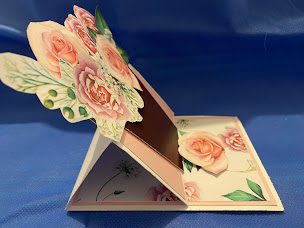
Here's how it looks from the sides - it gives you a better overall view of how it should sit.


I hope you like my card. Please leave a comment if you have any questions. Thank you!


Wednesday, March 1, 2023

Maisy the mouse and her flower bouquet - perfect for Mothers day!

 Coming up soon is not only Easter, but in the UK it is also Mothers Day, and what can be cuter than a card like this.

This months card was created for the Perfect Time to Craft Challenge March 2023 design team, and is sponsored by Conie Fong Art and Design

The design itself is called Maisy and can be found here. This really is cuteness overload!!

To make this card slightly different, after colouring the gorgeous image, I cut away most of the front of the card, leaving a strip in the centre. 

I then added a green background, that almost looks like grass but really compliments the colours of "Maisy". I then used raised sticky pads to stick her to the centre and added some pearl beads to the flowers to accentuate them. 

I also added a few white pearls to the back on the card for some added glamour.

I hope you like my card for this month!


Tuesday, January 31, 2023

Fly away cute butterflies! A simple pre-coloured decoupage card.

Anyone that knows me knows that I absolutely love cute things, whether that is animals, teddy bears and even greeting cards.

This months card was created for the Perfect Time to Craft Challenge February 2023 design team, and is sponsored by craftsuprint.com

The design itself is called Blooms in Elegance Hedgie Wishes and can be found here. This really is cuteness overload!!


This card involved several steps.

Firstly I printed out the parts I wanted


and then cut some of the flowers, butterflies and hedgehog parts out so I could decoupage the pieces on top of each other.


I then added silver mirror card behind to bring out the colours of the card and layered it all on a pink contracting card base. 


Finally, I added the pieces together and added some beads to finish off the design. It really looks like the butterflies are trying to fly right off the card!

You have to agree - this really is just sooooo cute isnt it?


Saturday, December 31, 2022

Colouring a Grey Scale Digi Stamp

 I am hopeless at colouring! I can see the picture and the effects that I want to achieve, but my brain relay the correct information to my hand and everything I colour looks like I am still in kindergarten. Because of this I tend to shy away from Stamping.


I am sure some of you reading this know exactly where I am coming from and feel the same way.

This months card was created for the Perfect Time to Craft Challenge January 2023 design team, and is sponsored by Ching-Chou Kuik Digital Stamps.

I opted for a greyscale picture to colour as I was promised it would be much more forgiving for me! It was so much easier and more effective that I ever thought it could be.

I chose the Keep In Faith-Grey scale PRINTABLE Instant Download Digital Stamp/ HOPE Sunflower Flower Girl Fairy Art by Ching-Chou Kuik. You can find the link to it here.

The first thing I did was to print out the picture on some lightweight card.

Then out came my multitude of colours and off I went!!

Once it was completed, I put it onto some bright yellow card and then onto my actual cardstock.

To finish off, I added some pearl beads to the top left and bottom right corners.


I am really happy with how this came out and will definitely be trying greyscale again!

Let me know what you think ........


Saturday, April 30, 2022

Step by Step Guide to Creating a Simple Decoupage Style card

 Decoupage - according to Wikipedia, Decoupage or découpage is the art of decorating an object by gluing colored paper cutouts onto it in combination with special paint effects, gold leaf and other decorative elements.

To be honest, it is a craft style that I have never played with as I am a terrible fussy cutter!

However, I thought that I would try and get over my fear and give it a try,

This card was created for the Perfect Time to Craft Challenge May 2022 design team, and is sponsored by Fred She Said. I used the Dahlia Garden set. Another confession - I am also hopeless at colouring - something I havent done since I left school, many years ago - so obviously I opted for the pre-coloured set. So as you can imagine, this card style was a real challenge for me. 

Enough of that though, here are the steps I took - just in case you want to try my design out.

First. here is the finished card.


First, I copied the flower, four times and printed it out - I planned the decoupage to have 4 layers.

I then cut out each flower before deciding which parts I wanted to keep. 


Once I had decided what I was keeping, I cut out the parts and started to layer them on top of each other using dimensional foam pads to separate the layers


I decided I would stick the flower on one corner, and use the cut off part on the opposite corner - thought it would look a little more interesting this way.


The next thing I did was to cut the sentiment out of a piece of flower - waste not want not - added a black piece of card behind it and then added some clear gems and small orange/yellow butterflies over the card. I then added this to an orange 7inch by 5 inch card to finish off. 

Those little gems look like raindrops, they are so cute!


So that was how I tried to conquer my fear of decoupage. Obviously, I need some more practice, but it is a start.

Why not have a look at the Perfect Time to Craft May 2022 challenge. Here is the link to the Facebook page where you will find information and links for the challenge

https://www.facebook.com/aperfecttimetocraftchallenge


Please leave your comments and see you again soon X


Thursday, March 31, 2022

Step by Step Guide to Creating a Simple Z Fold Card

This month has been BIG for me. After a break of around 15 years I decided to start cardmaking again. Almost immediately, I joined the design team at A Perfect Time to Craft AND started my first blog post!!!!

After such a long time out of cardmaking, (I have been creating other types of items though), I thought I would start with creating a SIMPLE Z-FOLD CARD.

This card was created for the April 2022 Challenge and is sponsored by The Hungry Jpeg. I used the illustration, pattern and texture from Woodland Musicians.

Here is the finished card.


This is how I made the card:

I printed off the illustration and the texture that I needed.


I also printed the background I planned to use - this is just so cute - look at those teeny musical notes!!


The next step was to cut out the picture I was using - I decided to use a shaped die to make this easier, and put it through my cutting machine. You can do this by hand if you prefer. 

I also cut out a slightly larger piece to go behind the main picture, and used craft glue to stick them together carefully.


I then took a 7 inch by 5 inch card that I already had made up. If you don't have one ready, cute a piece of card to 10 inch by 7 inch, then fold this in half to give you the right size piece.

Next, I folded JUST The front cover in half like this.


I trimmed the background pieces to fit the cards.

We need 2 pieces of 3 notches under 2,5 inch by 3 notches under 7 inches to give us a small border around the edges. We also need 1 piece that is 3 notches under 5 inch and 3 notches under 7 inches. (The two pieces are actually the same size - it is just the angle of the picture).


These backgrounds were then stuck onto the main card using craft glue.


After this I chose a stamp that I was going to use in the inside. Of course, you should choose your own here, or even leave this blank.

I took some cream coloured card and stamped my insert greeting onto it, before using the same size die to cut this out. 


The next step is to add the main picture onto the front. To create this effect though we only add glue to the LEFT side of the picture only - otherwise the card will not open properly.

I carefully stuck the insert greeting inside the card using the main picture on the front as a guide as I wanted it to be hidden UNDER the picture when the card was closed..


The final part of this card was to add a few clear gemstones on the front. I heard somewhere that we should add these as an ODD number as it was more random and looked better - I totally agree!


Let me know what you think?

Is there a particular card type you would like me to have a go at? 
Or a theme you think I should try?

Please leave your comments below. 


A Step by Step Guide to the Flower Pot Easel Card

Sometimes we need a nice and simple but a little more unusual card for someone close to us. I had seen this flower pot easel card floating a...