Sometimes we need a nice and simple but a little more unusual card for someone close to us.
I had seen this flower pot easel card floating around the internet, and thought that it could be used for a whole number of occasions, both happy but also sad.
This months card was created for the Perfect Time to Craft Challenge April 2023 design team, and is sponsored by The Hungry JPEG.
For this card, both the backing paper on the base and the flowers are from the Mediterranean flowers bundle.

So here is how I made it.
First, I chose the background and corresponding topper from the bundle above. I printed off 3 copies of the topper and 1 copy of the background, then fussy cut one full topper and some extra flowers from the other toppers to sit on my flower pot.
For the card blank, I took a piece of white card, and cut it to 11 inches by 4-1/4 inches.
I then scored this at 5-1/2 inches (in half) and at 2-3/4 inches (quarter). This gives us the basic Z-fold for the flower pot to sit on.
I took a pink piece of card as the background mat, and cut 1 piece to 5-1/4 inches by 4 inches for the base, and a second piece measuring 4 inches by 2-1/2 inches to cover the top piece of my Z-fold card.
I also cut out some additional pieces of card as follows:
1 piece of background paper measuring 5 inches by 3-3/4 inches for a matching mat on the bottom. If you have directional paper, don't forget to cut this so that the pattern is facing the right way (5 inches is the height and 3-3/4 is the width).
1 piece of 3-1/2 inch (tall) by 4 inch (wide) brown card. I made a small mark 3/4 inch in from either side on the bottom. Using my trimmer, I lined up the top left corner with the mark I made on the left side and cut the slope. I then did the same to the right side. This gave me a little flower pot shape.
To make the flower pot look more realistic I also cut a piece of brown card - 4-1/4 inches by 1 inch to sit at the top of the flower pot - for the rim. You cant actually see it on this card but it also gives a better support for all the flowers and leaves we had.
I now had all my pieces ready to use.

As this card is a top fold card, I added the mats and layers with the background paper in the right direction.
I glued the thin brown strip to the top of the flower pot and then lined the bottom of the flower pot with the mat layer so that it would sit nicely before sticking the top half of the flower pot to the top of the z-fold.
I glued on the main flower border that I had chosen, and built up the bouquet using the additional flowers I had already prepared - with the exception of 1 which was reserved for the stopper.
For the stopper, I used two layers of foam pads to stick to the base. This lifted up the stopper nicely so that the card would sit better.
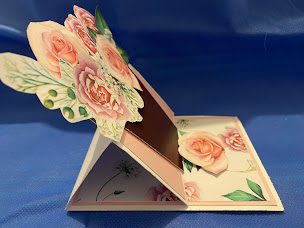
Here's how it looks from the sides - it gives you a better overall view of how it should sit.


I hope you like my card. Please leave a comment if you have any questions. Thank you!


